
Lately, I’ve entertained the idea of making video essays about some of the things I write about. Part of this impulse comes from pure curiosity. Many years ago, I used to create videos and animation and I’m interested to see how the tools have changed.
If I’m being totally honest, I also hate the idea that someone else might rip off all the research I’ve put into my upcoming book about immersive experiences. If anyone’s going to rip me off, I want it to be me. So there’s an element of professional pride too, plus a touch of “I bet I could do that.”
Through a curious stroke of fate, I’m acquainted with some extremely popular YouTubers, which means I’m under no illusions that any video I make would ever do numbers. I’m too flighty to sustain the level of content production required to build up a big audience, and I like writing too much to give that up. And yet – wouldn’t it be fun to try making a few?
First, I had to decide what topic to cover. I have ideas for multi-hour epics, but that seemed unwise for my very first video essay. If I ended up hating it, it would’ve been a shame to have wasted so much time, and if I enjoyed it, I might regret burning a good topic with beginner’s mistakes.
But that didn’t narrow things down much: there are dozens of things from my research I could make a twenty-minute video about. Thankfully, this is when my natural indolence reared its head. Why write a brand new script when I could just reuse an existing one? I give talks about “immersion” all the time; in Gothenburg alone last month, I did three.
Of those three, the most well-received was my eight-minute talk about the 2013 movie Austenland, which was based on my April Fools’ Day “review” of Austenland as if it were a real immersive experience:
This, I felt, was the perfect subject. Mostly lighthearted and silly, but not without a serious point to make. And unlike my longer talk about the early 19th century Russian director Nikolai Evreinov, which I’ll put on this blog later, it came with a whole movie I could illustrate the essay with.
Topic secured, I moved to the next pressing matter: buying completely unnecessary equipment. I already had the podcaster’s standard Blue Yeti mic, but I’ve never liked using it; it’s unwieldy, especially with a pop guard attached, and it picks up surface vibrations too easily. Rather than a shotgun mic that would require its own tripod, I opted for a DJI Mic 3.
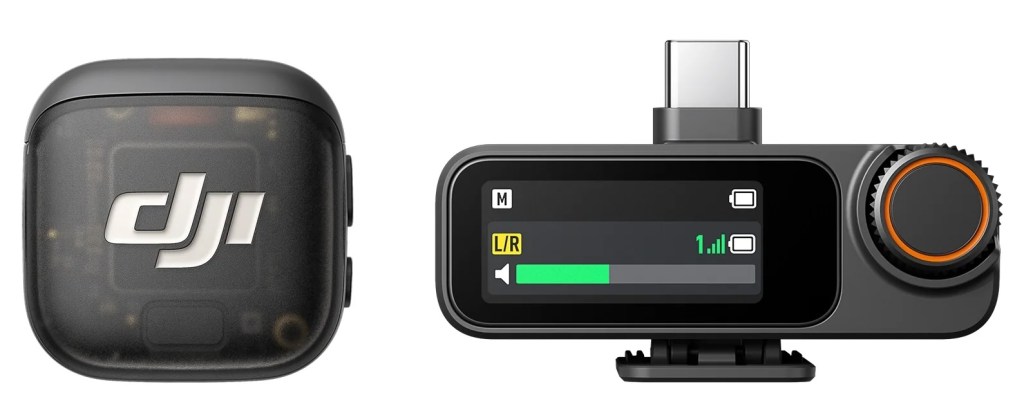
Wireless lapel mics aren’t really the done thing for video essays where you’re just sitting at a desk – they’re designed for people who are moving around – but they’re very easy to set up, which counts for a lot. Though the DJI Mic 3 is unquestionably overkill, I saved a bit of money by getting the new DJI Mobile Receiver rather than the fancy one with a built-in screen.
Next, I had to pick a camera. I have long lusted after those cool vertical “influencer” cameras with gimbals and stabilisers and screens, and the DJI Osmo Pocket 4 was newly released. Surely buying this would make me into a real YouTuber!
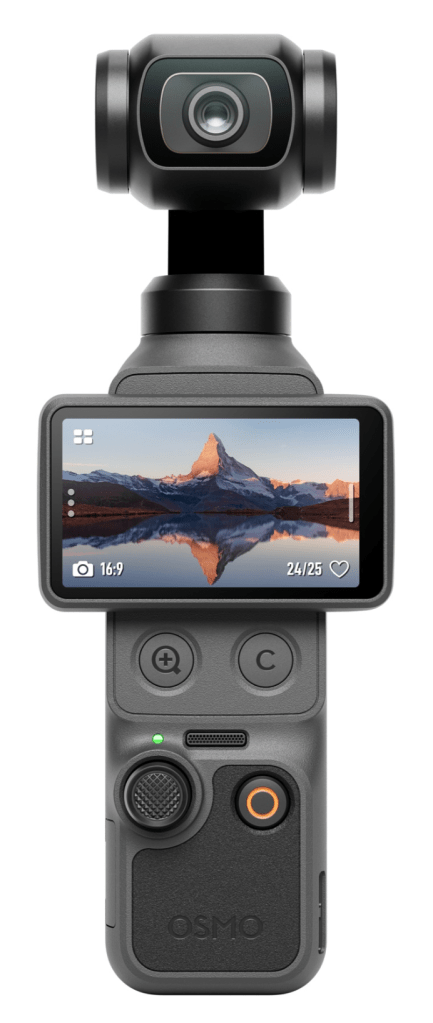
Try as I might, however, I couldn’t convince myself to spend £430 on a camera that I might only ever use once. I could use the DJI Mic 3 to get better audio on video meetings, whereas the Osmo Pocket 4 is best served taking footage in busy streets and theme parks, which I have no current plans for. At the very least, I ought to give my iPhone 17 Pro’s camera a go.
My first test with my iPhone involved me perching it on top of my MacBook with Belkin’s Magsafe iPhone Mount. This is designed for Continuity Camera, where your Mac uses your iPhone’s camera to capture video in real time. I suspected this would degrade the video quality but figured the ease of being able to see myself on my laptop screen was worth it.
It turned out that the video quality was only borderline acceptable for a 1080p recording, so after I remembered I could use my Apple Watch as a viewfinder, I just used the iPhone on its own. I don’t take many videos with my iPhone, so I was genuinely astonished at the image quality. In a well-lit room, any difference with the Osmo Pocket 4 or even an SLR is likely imperceptible.
With my equipment assembled, I found a good spot to film in and had a go at delivering my essay. Before long, I realised I had to write out a full script. I almost never write out talks in full – I prefer improvising from a detailed outline – but the video essays I like are much crisper. What’s more, I could already tell that editing would be way easier if I were working from a script. I am not such a good performer that I can make this feel spontaneous, however, so in future videos I hope to leave room for improvisation.
My script clocked in at 2,600 words, based on my talk and my blog post, but also on thirty prospective movie clips I’d collected by scanning the movie script and scrubbing through the movie itself. I saved a lot of time by doing all of this in Final Cut Pro (FCP), which lets you “favourite” sections of longer videos for easy retrieval.
FCP wasn’t my first choice of editing software. Since I was making a simple video, I’d been advised to use the free desktop version of CapCut. While it’s favoured by a lot of creators, as soon as I opened it up I had my doubts: this was not a “Mac-ass Mac app” that behaved like other native Mac apps. It didn’t even have a button to hide the windows! After I abjectly failed to figure out its smart masking tool, I gave up and downloaded FCP. It’s not free, but now that it’s part of Apple’s Creator Studio bundle, I could try it for 30 days and it’d only cost £13/month if I liked it.
Reader, I loved it. I know FCP has fallen out of favour in Hollywood versus Avid, but once upon a time it was used for actual movies and TV shows. In fact, I was worried it would be far too complicated for my needs. Thankfully, it had a surprisingly approachable UI that followed standard Mac conventions.
Just as importantly, it was blazingly fast. I’m shocked at how quickly I can import and edit and scrub through hours of footage, and how I can preview new effects in real time. Transcribing audio into captions takes seconds; colour correcting video clips is instant. When I had to synchronise the audio from my microphone to the video from my iPhone (I didn’t have my mobile receiver yet), it took no time at all. Even rendering the full video only took a couple of minutes. Finally, I have something that really pushes my MacBook M4 Pro.
The process of recording my twenty-minute script took the best part of an hour. I ran through it all in one go, doing extra takes when I knew I’d flubbed a line. The main downside here is that I don’t have a dedicated space with fully controllable lighting where I can set up a fixed camera; that meant that when, during editing, I realised there were a few lines I could’ve done better, there wasn’t a good way to re-record them without distracting changes in angle and lighting. I can address this, but only with a bunch of hassle and expense, which I’ll leave until later (if ever).
Finally, editing. Is it strange that I found this incredibly fun? FCP’s ease of use helps, but there’s something deeply satisfying about assembling a complete video out of bits of clips and sound and titles, and timing cuts for the best comic effect. I was planning to edit over a couple of days but I got so into it, I did it in a single evening. Maybe it shows! But I’m pretty happy with where it ended up, as a first try:
It won’t attract a big audience, but I found the process pleasant enough to do at least a couple more. These will be harder in some ways since I won’t be able to lean on an existing movie, but the subjects will be much more unique, such that I think viewers will forgive me for not having great footage for centuries-old events.
As for this blog, don’t worry: writing is my first love. There’s plenty more to come!
